Regardless of how you choose to make your money on the Internet, there is at least one key factor that all your online business models have in common: metrics. It is positively imperative that you keep track of your numbers if you want to succeed. In the context of email marketing, for instance, you’ll want to know how many subscribers you have on your mailing list, what your open rate is, what your click-thru rate is, what your conversion rate is, and so on. You’ll want to test and re-test to see which strategies are the most effective and which don’t perform as well.
And when it comes to any kind of website–a blog, a resource site, an e-commerce site, or anything else–you’ll want to keep tabs on your traffic numbers. Knowing how many visitors and page views you get each month isn’t enough either. You want to know more about the demographics of your site visitors, how they arrive at your site, what the bounce rate is, and what their on-site behavior is like. And for this, there are few tools as robust as Google Analytics. Better still, it’s completely free to sign up and use.
For many Internet marketers and professional bloggers alike, this may sound obvious enough. For anyone who is just starting out or for anyone who isn’t as familiar, Google Analytics can seem intimidating. The good news is that it really isn’t; you just have to get used to the interface and understand what all those metrics mean. Before you can do any of that, though, you’ll need to get Analytics set up on your website. This tutorial covers how you’d do it with a WordPress site, but the fundamentals are the same for other platforms as well.

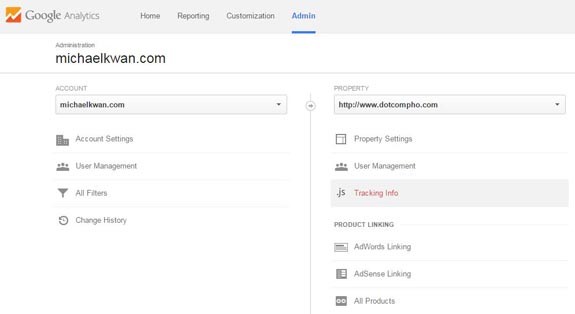
The first thing you’ll need to do is sign into your Google Analytics account. Then, click on the Admin navigation link at the top of the page. The resulting page is laid out in three columns. The far left one has your account and the middle one is for your specific web property. Use the pull-down menus to add your information accordingly.
After you’ve added your website to the “property” section, you’ll see a link called “Tracking Info” like how you see above. Click on that.

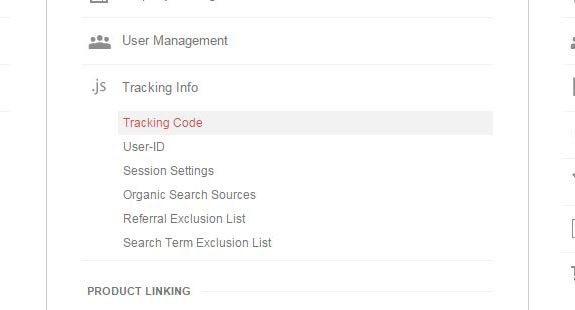
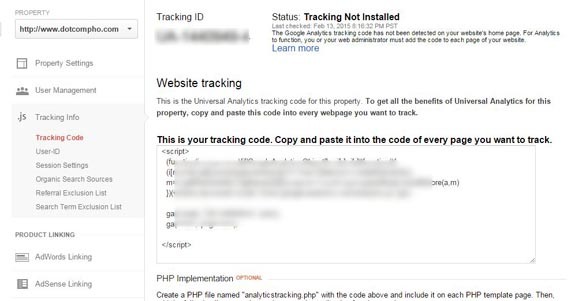
In the resulting menu, select Tracking Code. You can probably guess where this is going. Once you do that, a page similar to what you see below will appear.

The tracking ID is specific to that individual website (and all the web pages that it contains). In that main window, you’ll see several lines of code that you’ll then need to paste into your website. Highlight it and copy the code to your clipboard.
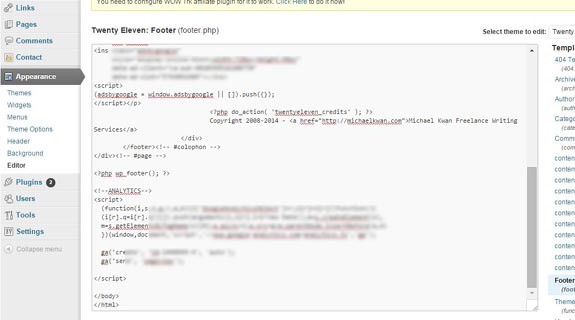
From here, log into the WordPress dashboard of your website. Under the Appearance section in the left sidebar, choose Editor. This brings up the raw PHP and CSS editor for your site’s WordPress theme. Assuming the proper permissions are in place, you can edit the code directly. Otherwise, you may need to use FTP to adjust the permissions or to edit the PHP files offline, uploading them back to your server.
Since you need the Google Analytics code to appear on every page of your website, one of the best places to insert it is in the footer.php file. This also means that it’ll load toward the end as not to hinder page load times for your website visitors. You could alternatively insert it in your sidebar, as an example, but sidebars may appear differently in different themes and you could introduce unnecessary complications.

Paste your Google Analytics code before the </body> and </html> in your footer.php file. It’s not a bad idea to add a <!–ANALYTICS–> section identifier for future reference, but this isn’t necessary. Don’t forget to save your changes too!
Back in your Analytics account, make sure that Google is checking for your tracking code. It can take a couple days for everything to start working, so check back now and then. Once it’s up and running, you’ll have access to some really detailed reports that you can then use to optimize your site for traffic, monetization and user experience.
