In my post on How To Speed Up Your Blog With a Content Delivery Network, I got a few people asking how I created the custom CNAME for my content delivery network. Before I show you, let’s review what a CNAME is. According to Wikipedia, a CNAME is the following:
A CNAME record or Canonical Name record is a type of resource record in the Domain Name System (DNS) that specifies that the domain name is an alias of another, canonical domain name. This helps when running multiple services (like an FTP and a webserver; each running on different ports) from a single IP address. Each service can then have its own entry in DNS (like ftp.example.com. and www.example.com.). Network administrators also use CNAMEs when running multiple HTTP servers on the same port, with different names, on the same physical host.
Doesn’t make a lot sense, does it? Let me make it easier. A CNAME is all about branding.
- Instead of having my CDN at blog.johnchow.netdna-cdn.com, it’s cache.johnchow.com
- Instead of having my mobile blog at johnchow.mobify.me, it’s mobile.johnchow.com
- Instead of typing gmail.com to get my email, it’s mail.johnchow.com
You don’t need to know what a CNAME is, you just have to know why you want it and branding is a big reason. Here’s how to do it.
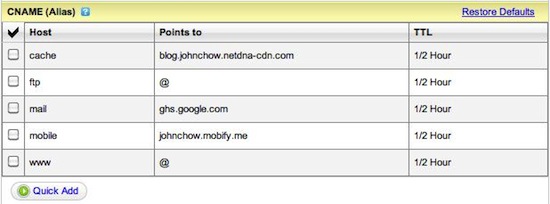
CNAME records are set in the DNS manager of the Registrar that host your domain name. Log into your Registrar and find the DNS manager. From the DNS manager, you’ll be able to find the Zone File Editor.


Click the Quick Add button to add a new CNAME record.

You can add as many CNAME records as you want. The default TTL is 1 hour but I like to set it to the shortest time possible (30 minutes). In the above example, you can see I CNAME cache to point to my CDN. When you’re done, hit the Save Zone File button and your new CNAME domain should be working within half an hour.
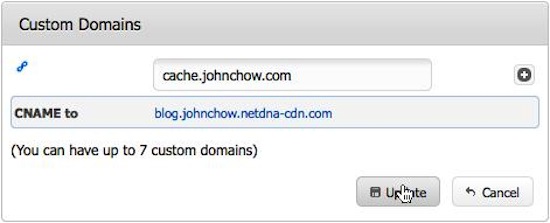
Once the zone becomes active, log into you Content Delivery Network provider (MaxCDN in my case) and add the new custom domain name (cache.johnchow.com in my case) into your Pull Zone settings.

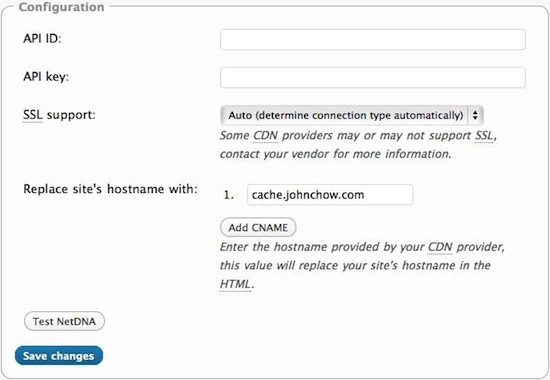
Once that’s done, log into your WordPress control panel, go into W3 Total Cache, select CDN settings and enter your custom domain in the “Replace site’s hostname with:” field.

You’re done. Your CDN will now have your domain name in it instead of the CDN provider’s.
