At this point, if you are the least bit interested in almost any kind of marketing on the Internet, you should be getting into video (if you’re not already doing it). And while platforms like Twitch, Facebook, Twitter and Instagram have certainly made some headway in this space, YouTube is still the undisputed king of online video at this point. It pays to dedicate at least some of your time and energy into building an audience on YouTube.
I’ve written quick guides to features like the end screen and YouTube cards, and how you should be leveraging these features for maximum benefit. From a search engine optimization (SEO) perspective, you should also be paying very close attention to the tags you assign to each video, just as you should be mindful about the title and video description.

And just like any other SEO practice, taking blind shots in the dark is probably not the most effective strategy you can take. Instead, you might consider a tool like TubeBuddy. It’s YouTube certified and you can get started for free. Premium plans start at $9 per month for additional tools and features.
Even with just a free account, TubeBuddy can be very helpful in maximizing what you get out of your YouTube videos. One of my favorite features is the Tag Explorer. Let’s use my vlog on comparing the Rode VideoMic Pro shotgun microphone with the Boya BY-M1 lavalier microphone as our example.
When I was going through the process of uploading my video and writing the accompanying title and description, I also took a little time crafting together the collection of tags I wanted associated with the video. In the past, I would just type in what came to mind. Some people might use the AdWords keyword planner or other similar tools, but those aren’t necessarily 100% accurate or relevant for YouTube. The TubeBuddy Tag Explorer is.

When you get near the bottom of the screen, you’ll see something called Tag Tools. That box contains a number of buttons like the ability to copy the list of tags you’ve already added, clear the list of tags, import tags from a saved list and so forth. In this context, one button of interest is “Suggest.”
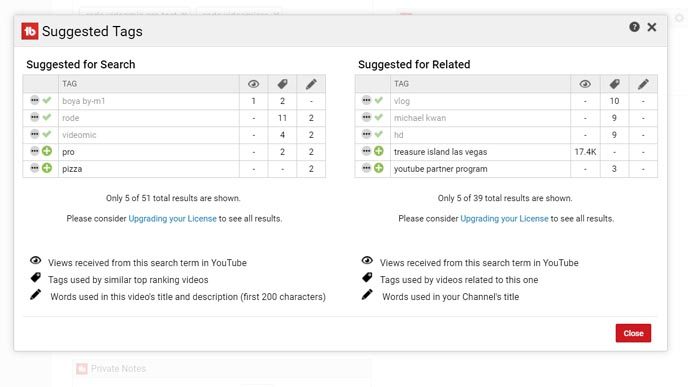
TubeBuddy looks through your content to suggest tags for both “search” and “related,” showing the views received from this search term, tags used by similar top ranking videos, and words used in the video’s title and description. Simply click the green “plus” symbol to add the tag to your video.
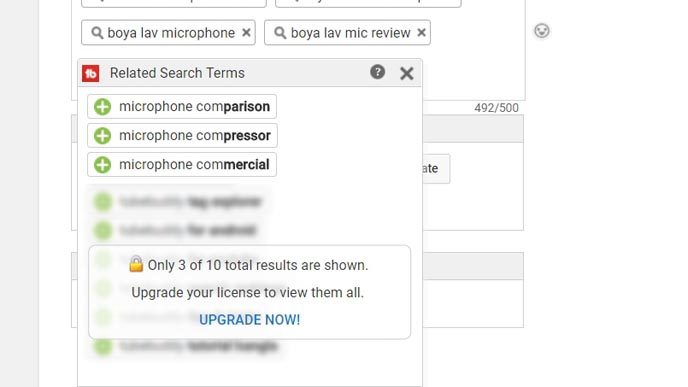
Back on the main “edit video” screen where you add your video tags, you’ll also find a very useful feature. As you start typing out any tag, a window will hover on top to provide related search terms that “autocomplete” what you’re typing. With the free account, they’ll show three results at a time. You can upgrade your license to a paid plan to unlock more.

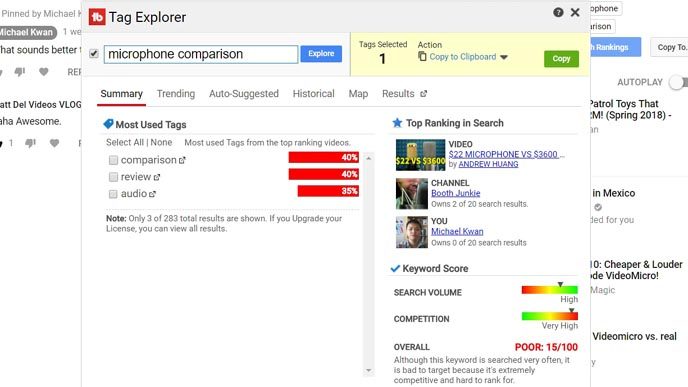
But you don’t even need to be on your own “edit video” page to take advantage of Tag Explorer. Whether you’re watching your own video or someone else’s, you can see the tags associated with that video on the right side. Clicking on any of the tags brings up the Tag Explorer. The window offers a summary, including the most used tags from top ranking videos for that tag, as well as a keyword score based on search volume and competition. It’s just like a keyword planner, because that’s precisely what it is.

This is perfect if you want to “spy” on the “competition.” Research tags that are attached to high-performing videos in your niche, videos that you may want to emulate. You can see not only what tags they are using, but what related tags you might assign if you produce a similar video. The Tag Explorer can also show trending tags, auto-suggested tags, and the current search results for that tag. This is all great research material.
Considering that you can get into vlogging for $200 or less, getting your feet wet with YouTube is well worth the investment of time, money and effort. Leverage tools like TubeBuddy to maximize your shot at success and reduce the guesswork of YouTube SEO best practices.
