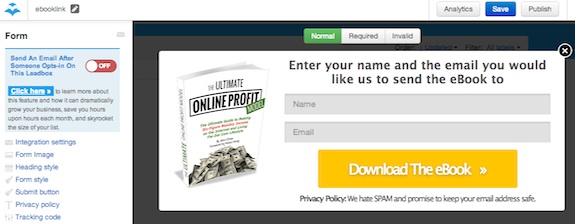
My recent post on How To Get Leads From Your 404 Page got a lot of positive feedback. I also got a lot of questions asking how I was able to pop an opt-in box when people click on my eBook link. If you click the link, you’ll see that instead of taking you to my normal eBook landing page, an opt-in box appears instead.
LeadBoxes by LeadPages
The feature that makes this all possible is called LeadBoxes (it was originally called LinkLinks), and it’s made by my friends at LeadPages. With LeadBoxes, you don’t need a whole landing page to build your email list anymore. By adding a single line of code to any existing webpage, you can use LeadBoxes to grow your list from anywhere. Watch the video below to see LeadBoxes in action.
Creating a LeadBox
Setting up a leadBox with LeadPages is even easier than creating a landing page. All you have to do is go to the LeadBoxes section of LeadPages and click on Create New LeadBox. Then it’s just a matter of changing the text, ebook image, colors, and call to action to your liking.
Like LeadPages, LeadBoxes integrates with all major email service providers, like Aweber. You can also integrate LeadMagnet delivery to deliver your eBook once a reader subscribes to your list.
Once your LeadBox is created, you just have to copy and paste the code to your blog (or someone else’s blog if you’re doing a guest post), and your opt-in box will appear whenever a reader clicks on it. Watch the video tutorial below on how to embed your LeadBox.
How To Get LeadBoxes On Your Blog
If you’re a LeadPages customer with a Pro account, you can start using LeadBoxes right now. You can create an unlimited number of LeadBoxes with your Pro account. If you have a standard LeadPages account, you will have to upgrade to the Pro account before you can use it. The higher opt-in rates from the LeadBoxes would justify the upgrade. The Pro account also offers A/B split testing. The makes the upgrade a no brainer for me.

